Bodhi Freeway 3 allows you to filter equities on:
- The entire first 2 levels of GICS (Global Industry Classification Standard);
- On the 3rd level of the Materials Industry group (Chemicals; Construction Materials; Containers and Packaging; Metals and Mining; Paper and Forest Products)
- On the 4th level of the Real Estate Investment Trusts Sub-Industry group.
You can choose to make these directories yourself or you can use the GICS Add Wizard which will make them for you.
PLEASE NOTE: The instructions below tell you how to create the directories in Bodhi Freeway 3. They do not copy over any of your historical data. To load historical data into these directories you will need an updated Bodhi History CD-ROM.
To create these directories using the GICS Add Wizard
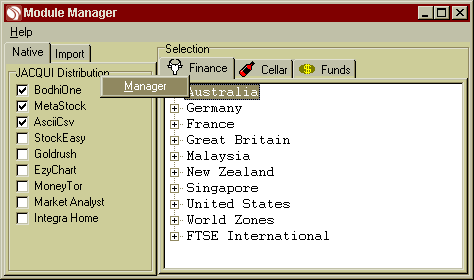
- Open Bodhi Freeway 3.
- Click the Configure button.
- Right-click on the words DEFAULT Distribution.
- Click the Manager button. The Profile Manager dialog box will open.
- Go to File>Copy Selected Profile.
- Enter a name - (for example: GICS) then click OK.
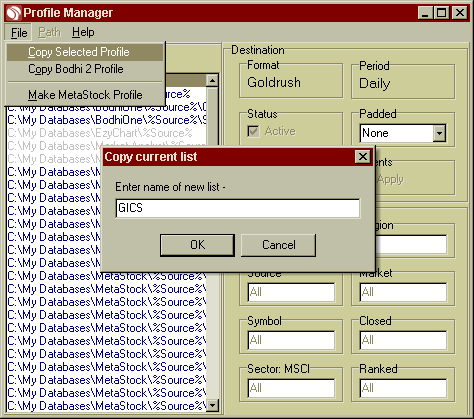
- Click OK to the Warning Message. Your new GICS distribution list will now be active.
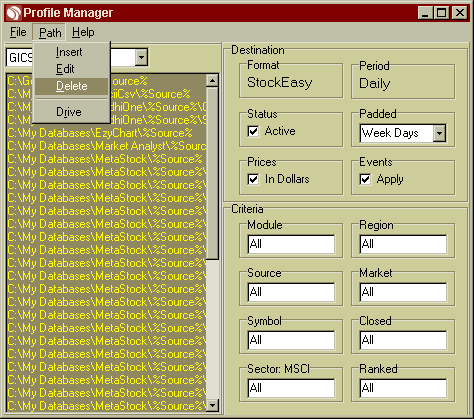
- If you only want your data filtering into GICS directories, delete all the other records in this list. You can do this quickly by clicking on the first directory then scrolling to the bottom of the list and clicking on the last directory, whilst holding down the Shift key. The entire list should now be highlighted. Go to Path>Delete.
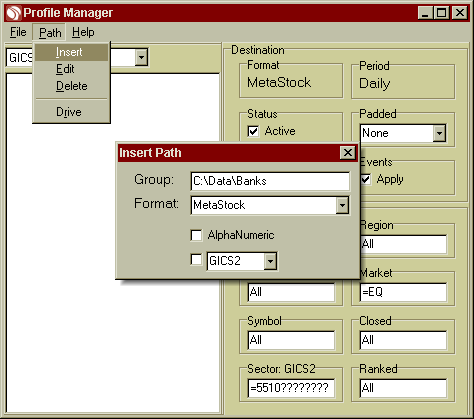
- To create the GICS directories, go to Path>Insert. The Insert Path form will appear.
- In Group, type in the directory you want to create. The wildcards available in Bodhi Freeway 3 2 are also active in Bodhi Freeway 3 3. Wildcards such as: %Source% that filters all the data into a 3 letter exchange code (i.e. Australian Stock Exchange = ASX) and %Market% which filters all the data into market groups such as Equity, Indice etc.
Please Note: The GICS filtering only works in the Equity market groups. If you want to also follow indices you will need to create a separate directory for these.
Important Note: If you are following multiple Exchanges (i.e. ASX, NASDAQ & NYSE) and you want all the data to go into the one group of GICS directories you will need to add a prefix or suffix to the market groups so you can easily identify them. To learn how to do this, read the tutorial: Creating Prefix and Suffix.
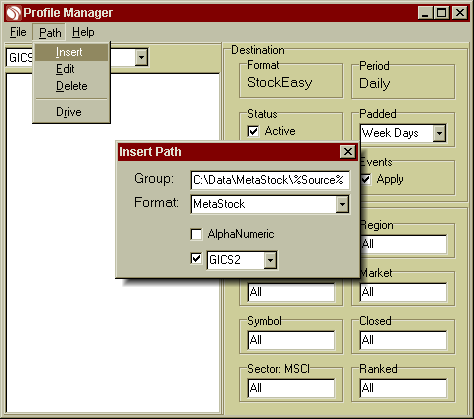
- In Format, choose your required format from the drop-down box. You can only do one format at a time. If you are using multiple formats, simply repeat these instructions.
- In the MSCI drop-down box, choose the level of GICS that you require then place a tick in the box next to it. Exit the box [x].
- Bodhi Freeway 3 will now create a directory for every GICS group in the level that you selected. If you did not use the %Source% in your directory then all the exchanges that you choose will be added to these directories (for example: if you are downloading ASX & NYQ Equities they will both be found in the same directories). This could cause problems where the symbols are identical on the different exchanges. To solve this problem either add extra filtering or create a prefix or suffix for your codes.
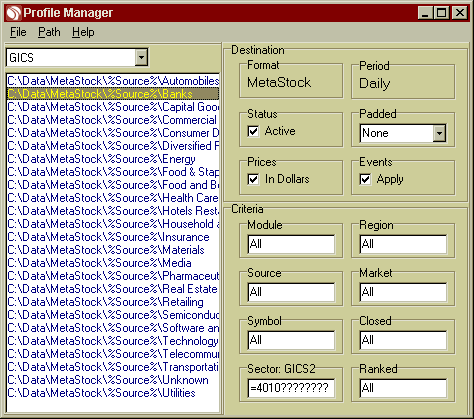
- In this tutorial, I used the 2nd Level of the GICS. This level contains a code of 4 numbers, the 1st level has a code of only 2 numbers. If you look at the picture (above) you will see that the GICS2 Sector box in the Criteria section is filtered to the Banks GICS code of 4010.
- As previously stated, the GICS classification only works on Equities. To make sure only Equities are filtered into these groups we need to make the Market filter equal Equities.
- Click on the first directory then scroll to the bottom of the list and click on the last directory, whilst holding down the Shift key. The entire list should now be highlighted.
- Double-click in the Market Criteria box. The Market Filter Editor box will appear.
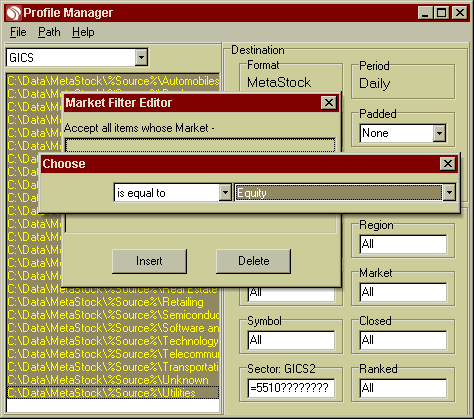
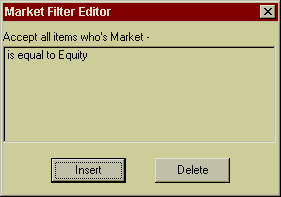
- Click the Insert button. From the second drop-down box, select Equity then exit [x] the Choose box.
- Exit [x] the Market Filter Editor.
- All your directories will now be filtered so only the Equities are exported to these directories
If you only wanted to follow one or a couple of GICS sector's you could create the directories manually without using the GICS Add Wizard.
To create GICS directories manually
- Open Bodhi Freeway 3.
- Click the Configure button.
- Right-click on the words DEFAULT Distribution.
- Click the Manager button.
- Go to File>Copy Selected Profile.
- Enter a name - (for example: GICS) then click OK.
- Click OK to the Warning Message. Your new GICS distribution list will now be active.
- If you only want your data filtering into GICS directories, delete all the other records in this list. You can do this quickly by clicking on the first directory then scrolling to the bottom of the list and clicking on the last directory, whilst holding down the Shift key. The entire list should now be highlighted. Go to Path>Delete.
- To create the GICS directories, go to Path>Insert. The Insert Path form will appear.
- In Group, type in the directory you want to create. The wildcards available in Bodhi Freeway 3 2 are also active in Bodhi Freeway 3 3. Wildcards such as: %Source% that filters all the data into a 3 letter exchange code (i.e. Australian Stock Exchange = ASX) and %Market% which filters all the data into market groups such as Equity, Indice, Option etc.
Please Note: The GICS filtering only works in the Equity market groups. If you want to also follow indices you will need to create a separate directory for these.
Important Note: If you are following multiple Exchanges (i.e. ASX, NMQ & NYSE) and you want all the data to go into the one group of GICS directories you will need to add a prefix or suffix to the market groups so you can easily identify them. To learn how to do this, read the tutorial: Creating Prefix and Suffix.
- In Format, choose your required format from the drop-down box. You can only do one format at a time. If you are using multiple formats, simply repeat these instructions.
- In the MSCI drop-down box, choose the level of GICS that you require. DO NOT place a tick in the box next to it. Exit the box [x].
- Bodhi Freeway 3 will now create your directory and change the Sector filter to GICS2. If you did not use the %Source% in your directory then all the exchanges that you choose will be added to these directories (for example: if you are downloading ASX & NYS Equities they will both be found in the same directory). This could cause problems where the symbols are identical on the different exchanges. To solve this problem either add extra filtering or create a prefix or suffix for your codes.
- We now need to add a filter to the directory so only the symbols that belong to the Banks Sector are distributed. To do this, double-click in the Sector: GICS2 box so the Sector Filter Editor appears.
- Click on the Insert button. Select Banks from the second drop-down box then exit [x] the Choose box.
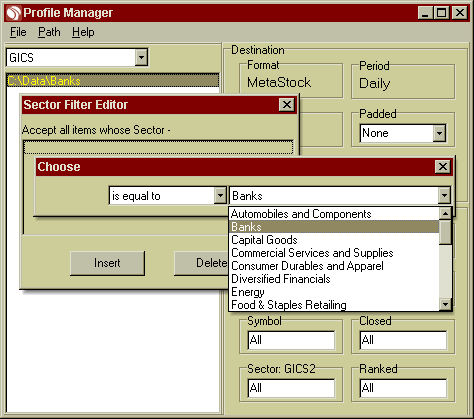
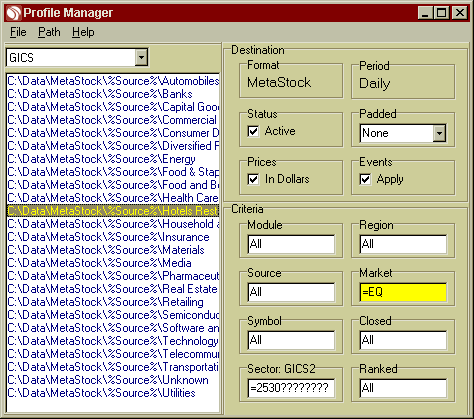
- Exit [x] the Sector Filter Editor. The Sector filter will now contain the code: =4010????????.
- As previously stated, the GICS classification only works on Equities. To make sure only Equities are filtered into this group we need to make the Market filter equal Equities.
- Click on the directory so it is highlighted. Then double-click in the Market Criteria box. The Market Filter Editor box will appear.
- Click the Insert button. From the second drop-down box, select Equity then exit [x] the Choose box.
- Exit [x] the Market Filter Editor.
- This directory is now configured to contain all equities (you have selected) that belong to the Banks GICS Level 2 Sector.
|